▲
 Lighting for a webcam is actually quite simple. A lamp placed to one side of your computer monitor should normally be sufficient. A lamp with a white translucent shade will give a more pleasing image by softening the harsh shadows which a bare bulb would make.
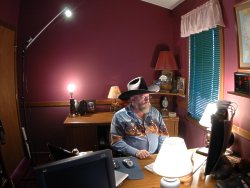
If you have a camera that doesn't do well in dim light, use brighter light bulbs. Experiment with different wattage bulbs to find the best level for your particular setup and camera model. Or, you might consider placing dimmers on each lamp so they can be individually controlled for the best effect. That's how I did my demonstration setup seen in the photos on this page.
Avoid lights in direct line of sight of the camera. This tends to effect the auto exposure and sometimes color balance of your images. Yes, I know, my regular setup has several lamps in front of my cameras, but this page is about good lighting, not my lighting.
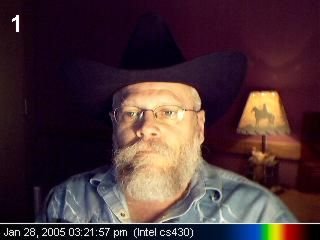
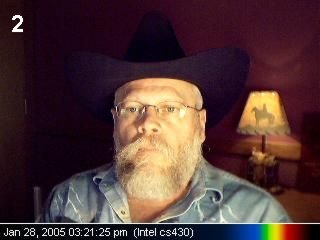
For a better lighting setup try two lamps a foot or so on either side of and slightly behind your camera. You can improve on this basic arrangement by placing a lower wattage bulb in one of the lamps. You might start with a 100 watt bulb in one and a 25 watt bulb in the other. Compare the right side of my face on images 1 and 2. (That's my right not yours) In image 1 there was only one lamp being used on my left. In image 2, notice how the right side is just a bit brighter than in image 1 after adding a second light.
The brighter lamp produces what the pros call the "key light" and the lower wattage one is called the "fill light". The purpose is to place the main lighting on one side of your face and fill in the other side with just enough illumination to keep that side from being completely dark. This is better than 2 lamps the same brightness because it gives some shadow on the face adding depth to the subject. The same effect can be achieved by placing one lamp further away from the subject.
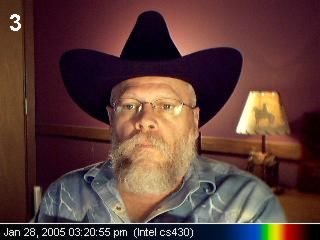
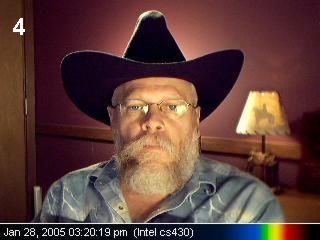
Want to really wow your viewers? Place an unshaded lamp behind you near the wall. See the difference between image 2 and image 3. Unlike my little experiment seen in the photo at the top of this page, you should create a shield to block the light bulb from the camera if you move your head around while using your camera.
It should be easy to cut a circle of cardboard about 6 inches in diameter and fasten it to a length of bent coat hanger mounted to the lamp to hold it away from the bulb. We don't want a fire after all. Again experiment with different wattage bulbs to get a light that works well with your camera. You just want to illuminate the wall a bit, not so much as to overexpose the camera, which would darken your face.
Alteratively you could use a low wattage spotlight in a clamp light or fixture sitting on the floor and pointed at the wall. You will probably want to have this light on a dimmer as it is very hard to keep these lights from being too bright.
For even more improvement to this effect, suspend a small spot light about 4 or 5 feet above and a couple of feet behind your head. Choose a lamp with a wide enough beam to light your head and shoulders, plus a bit to move around in, but not so wide as to spill all over the room.
For this "back light" I used a 50 watt 12 volt halogen mini spot light suspended from a tall tripod. You could also use a narrow beam spotlight in a clamp light fastened to a shelf or the top of a door. This lamp highlights your hair or hat, and makes the edges stand out from the background. Notice how the front brim of my cowboy hat blends in with the crown (top) in image 3, but stands out in image 4. Try to keep any of this light from shining onto the camera as many cameras will give you some flair if light strikes the lens, even from an oblique angle.
Compare the front of my face between image 2 and 3. In image 2 my face is a bit washed out because I had too much light coming from the front lamps and not enough on the background. The dark background caused the camera to lighten up, trying to even out the entire picture.
No matter what kind of lighting you use, it is important to experiment with lamp wattage, dimmers, or distances of the lamps from the subject to achieve the best lighting balance from bright to dark.