▲
Purchased December 14, 2012 $99.99
(reduced from price on box of $129.99)
As this is my first foray into IP security cameras, I will have to feel my way through.
First point is this is a security camera and is not designed to be an HD webcam for online chatting or making videos for YouTube.
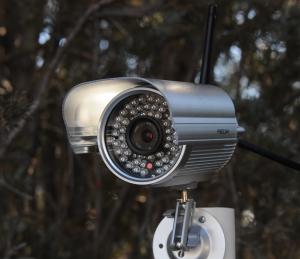
My first impression as I pulled the camera out of its box was Boy, this thing is solid. The case is solid aluminum and quite heavy. Of course I am comparing it to all the webcams I have been reviewing.
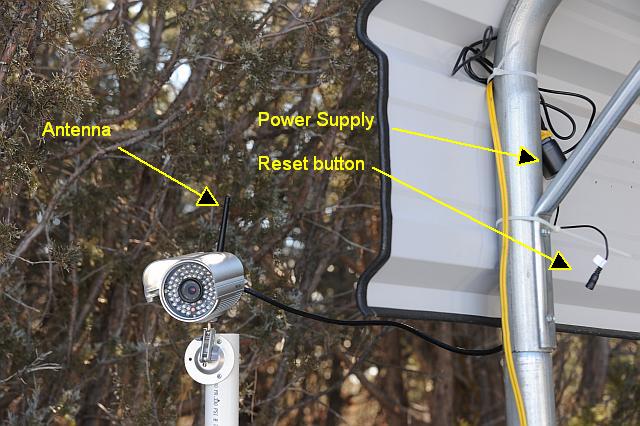
The camera is marketed as weatherproof and it appears that it is very well adapted to harsh weather. The cable is heavy duty and permanently mounted to the back of the camera with a fully weatherproof connector. However, the cable is only about 3 feet long and terminates in 3 short breakout cables. One for the ethernet connection, one for power and another with little reset button on the end of it. I would not want to have these items exposed to the weather so, in my opinion, the camera should be mounted in such a location that would allow these connectors to be either inside a building or at least in a weatherproof housing of their own.
The body of the camera has 3 mounting screw thread sockets along the bottom, (for different distances from the wall I would assume) and one on the top. These screw sockets do not penetrate all the way through the housing so it would be impossible to get water in through them. The only problem I had with the installation was the adjustable bracket that holds the camera to the mounting plate. It has 2 thumbscrews to tighten the mount around 2 small ball bearing style mounting points, but I ended up having to use a pair of pilers to get the thumbscrews tight enough to keep the camera from moving. In the process one of the thumbscrew handles cracked.
My initial experience with trying to setup this camera was frustrating, primarily due to poor English in the manual and lack of clear instructions in the setup window that the instillation CD brings up on your screen.
The CD installs a basic tool which searches the network trying to find Foscam cameras. It then presents you with a command prompt style window with a list of IP addresses of any cameras it finds, with no instructions. You have to reference the manual to figure what to do next. Turns out you have to double click on the line for the camera you are setting up. Double clicking inside a command prompt window is something I have never experienced before. Turns out, while it looks like a command prompt window, it is actually a true window with clickable features in it.
I'm pretty computer savvy, having been working with PC's for over 35 years, so I tend to run the software that comes with a product first, then work my way from there. With things I work with all the time, such as web cameras, the manual is generally the last thing I look at, and only when I can't otherwise figure something out. This manual is very confusing and I had a good deal of trouble understanding exactly what many of the instructions were referring to due to misuse of words and poor English grammer.
Here is one of the more obvious examples.
"Adhock network
Step 02) Plug out the network cable and camera will restart.
Open the wireless network card of PC and search the wireless network around the area. You can find the SSID you filled for the camera (Figure 2.4)"
No, those are not my typos. Enough about the instruction manual.
On the version of firmware that came with my camera, the initial login screen had lines to enter the user name and password. Next to those were what looked like buttons but turned out to be only lables. The 3rd lable down ended up being a button which you had to push to proceed. After a firmware and web UI (User Interface) upgrade, that confusion had been fixed, instead you get the standard login box that is included with Windows.
WARNING: DO NOT try to upgrade either the firmware or the web UI interface (a separate download process) without first contacting their technical support for instructions. Their website has upgrades available (after giving them your email address to be able to login) but currently the instructions are totally inadequate to understand the complex issues involved in version comparability. And again the instructions are confusing due to poor English grammer. Apparently the firmware and web UI must match properly otherwise problems will arise. I didn't upgrade the firmware because the website said the only version available for download was not compatible with the particular version which was already installed on my camera, even though it was the same version. The website didn't say anything about not upgrading the web UI. After I upgraded the web UI, the setup screen dealing with FTP had no option to enter a file name, so the FTP feature became useless. The only reason I had tried to upgrade the web UI was because one of the screens wouldn't save the settings upon exit.
The upgrade I was sent after contacting tech support resolved that issue and several others. By the way, tech support was friendly and helpful. They responded within 12 hours of my request and that was on a weekend. In total it took 3 emails to resolve the problem but only because I had to send them photos of the lables on the camera so they would know exactly which firmware version to send me. The tech told me they are planing on updating their website and even asked me for suggestions on improving their website, so I am hopefull that the site will become more user friendly.
I am actually quite impressed. While the quality of the image doesn't begin to compare with most of the USB style computer webcams, it was much better than I had expected. Again, remember this is my first experience with any of the newer security cameras, so at this point I don't have any other models to compare it with.
In bright daylight, the camera has some difficulty dealing with scenes that have very wide brightness levels. It tends to bring the darker areas up in brightness while over exposing the direct sunlight areas. I guess that might be a good thing for a security camera so you can see the bad guy in the shadow and make out some detail.
I am most impressed with the image in infrared (IR) mode. It is very easy to make out most details and the IR illumination of the camera stretches for over 100 feet. However, that also tends to over expose items close to the camera.
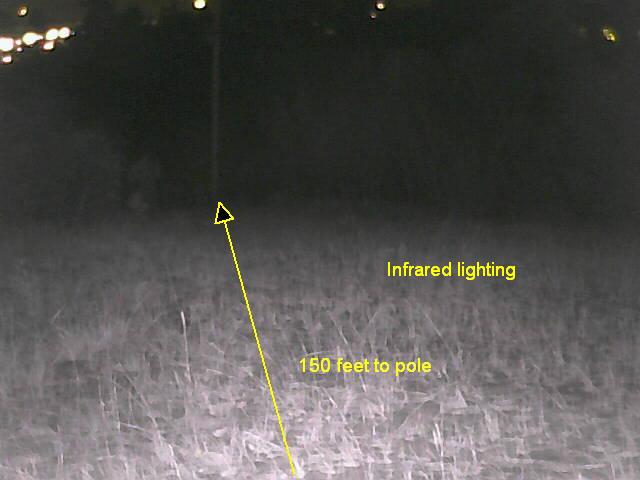
I think the test images will speak for themselves. I was unable to take shots using the "cowboy lamp only" or "monitor only" simulations because the IR on the camera cut in as soon as I turned out the lights. As another point, there are 2 controls in the software that appear to be for turing off the IR on the camera, but they don't appear to do anything.
For reference, my camera is using Firmware version 11.35.2.48, and Embedded Web UI version 44.4.20.3, so all comments concern those version numbers.
One warning: it appears that in this version you cannot use special characters in the password. (! @ # $ % ^ & & * ( ) +) The password I tried to enter contained one of these characters. The camera allowed me to type in the character and it appeared to save it after which I was no longer able to login to the camera. I had to reset the camera back to factory default and use a password without any special characters.
The first window you see when logging on gives you 3 choices. Internet Explorer, which requires an active-x control to be automatically installed. Server push to use with Chrome, Firefox or Safari. And an option for viewing from your cell phone.
The next screen (Main Window) gives you a live view of the camera and some basic settings. In the upper left are 2 buttons that say they are for turning on and off the IR view, but I couldn't get them to do anything.
Under the Device Management link (lower left corner) you will find numourous configuration screens. I have created screen captures of several of the more inportant screens below.
You can have the camera upload a still image to an FTP server at regular intervals. In the Alarm settings you can have the camera upload time stamped images when it detects movement. The software will also record live video on an alarm, but the software has to be running on a computer and viewing the camera before video can be captured. The camera cannot capture video by itself. Video is saved in AVI format so it can create very big files very quickly.
The alarm seems to trigger about 2 to 3 seconds after the camera senses movement and continues recording until about 15 seconds after movement stops. I have converted and edited the video captures below to make the file sizes smaller.
The camera can also send email notices if an alarm is triggered. This might be good for monitoring a warehouse or room, but not for outdoor shooting. Any movement by an animal or the waving of limbs will trigger an alarm.
There is also the ability to use several Dynamic IP address services, including a free one supplied by the manufacturer.
Overall I am impressed with my first IP camera (not counting the few I reviewed 6 years ago). If what you are interested in is security or area monitoring, this seems to be a pertty good bet, especally since it only costs around $100.
 | Sample images showing how this camera performs under different lighting conditions |
See large images 640x480
Video captures (Windows Media files)
Visible Light (2.9 megs) Infrared (4.6 megs)
I am carrying a flashlight in the IR test because it was done in total darkness and I had to see where I was stepping.
Setup screens
Main Window
Device Status
User Settings
FTP Settings
Alarm Settings